Wednesday 7 July 2010

Batch painting

What is the bane of every wargamer? Unpainted miniatures. Whether they are the missing character or unit from an army or a complete force of grey plastic, there is nothing worse than an unpainted army except for bases with lumps of polystyrene and a semi legible name written on them representing dreadnoughts/titans/giants.

This is where batch painting comes in.

Gondor Archers

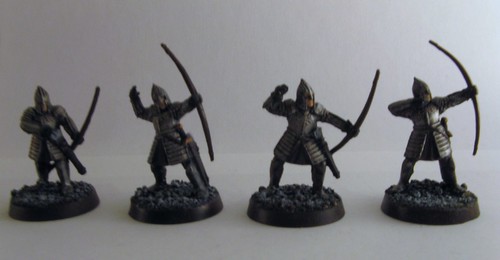
These archers aren't going to win an prize, but I painted 8 of them up in less than 2 hours while doing other things.

There are several secrets to batch painting.

Plan

- pick a limited number of colours and try to stick to them.
- know how detailed you want the models to be ie base coat, wash, highlights.

Tools & Techniques

- When painting a large number of figures, things like drybrushing metallics are a good time saving measure.
- Production line - give all the models one colour at a time ie do all the models armour at once. This means you get everything finished quicker and because you do the same thing again and again, you get better at it and pick up your mistakes.

The final rule is this - know when to stop. Painting OCD kills projects stone dead as you try to paint every figure to the highest standard that you can. Remember the two feet rule (if it looks good from two feet away, it is ok for rank and file) and stick to it.

There have been some recent developments that aid swift batch painting.

Foundation paints (GW paints that give decent coverage in one coat).
GW washes (washes that go pretty well with foundation paints).

GW is the biggest supplier of acrylic model paint to wargamers mainly because so many people started gaming with GW and they cross promote their paint range so well. For basic techniques GW paints are pretty good.

The LOTR Gondor archers above were spray undercoated black.
A boltgun metal drybrush was applied to the armour.
A brown ink wash was applied to the armour.
A light mithril silver drybrush was applied to the armour.
The gloves were touched up with black.
The cloth was painted graveyard earth.
The bow and leather were painted charred brown.
The face was painted bronzed flesh.

The base was drybrushed with codex grey and then another lighter grey (which was used on the feathers on the arrows).

The model isn't perfect. Not by a long way. If I were painting it now I'd wash the face with Ogryn flesh wash and add a dose of magic wash at the end. However the models look fine from two feet away.

I think the grim realisation we must come to is that no one cares if you wet blended your goblin spearmen or skaven slaves. Your Shamen on Wyvern or Screaming Bell? Yes, because those are display pieces. Your sixth rank of clanrat pushers around the bell? Not so much.

Converted Space Marine Dreadnought

When Planet Strike came out I was inspired to do something with my second Black Reach dreadnought. Like many people I had got two sets (for all those miniatures of course, though I did swap the spare rulebook for even more miniatures).

Really this is an advert for clipping every piece of bling off every sprue and tucking it away in a box.

GW don't do a heavy flamer right arm for their marine dreadnought, so I converted one using the multi-melta arm and the heavy flamer from the Sentinel kit. I made it quite long rather than short to give an obvious difference from the multi-melta and to make it look like something that justifies rerolling failed wounds on everything it hits. The storm bolter has been replaced by a flamer from the 2nd ed marine sprue.

Dread1

Dread2

The resin base is from Fenris games. I made a big order when 5th ed came out and all my marine resin bases are from there.

The Black Reach Dreadnought is a very nice 4 piece model, and paints just fine out of the box. However on both of mine I have been unable to resist adding additional details to a) make them look different to each other and b) make them look more interesting. With things like dreadnoughts I don't think anyone should hesitate to add a bit more detail.

Saturday 3 July 2010

This is my first Heavy Gear model. I acquired a large lot of 2nd hand Heavy Gear stuff (some assembled/undercoated, some mint in box) as I was after some 15mm scale mechs and I liked the look of the Heavy Gear models. Heavy gear is actually 1/144 scale or N scale, but are the right size for what I was after for the 15mm skirmish games I want to run.

Having spent the last year mostly modelling and painting warmaster stuff, and unsure of how to paint two full armies, I decided to do something I hadn't done in a very long time - a test model. I cracked open the jager paratrooper blister and examined the contents. I've included a picture below of the parts for a jager paratrooper. Nine metal pieces for a model that stands at 30mm tall without the base. I used to put together 5th edition warhammer multi-part metal kits. I've assembled first edition B5Wars ships. I've assembled Krootox. 9 metal parts on an infantry trooper doesn't seem too tough.

Parajagerparts

It turned out not to be. Cleaning the flash off took about five minutes, though I recommend using a knife and file and carefully checking each piece. I drilled 6 holes for a total of four pins (engine block to torso, paratrooper rifle to gun hand, each foot to the base) and that gives a pretty solid model. As you can see in the component picture I substituted a 30mm round base for the hex base. I did this for aesthetic reasons and as I may not be playing using the heavy gear rules all the time. There was a slight miscast on the clip on the paratrooper rifle which I filled in using green stuff and a damp knife to smooth. This left me with two pieces, the vibro bayonet and the spare grenade magazine, that didn't fit anywhere obvious.

Carefully examining the concept art on the blister told me that what I thought was a bayonet was actually a knife in a wrist attachment. A small lozenge of green stuff and a drop of super glue firmly secured it. Looking at the spare magazine it may in fact be a drop fuel tank. From the concept art all I can tell is that it doesn't go on the front of the model. I'll leave it off and it can go in an ammo/fuel pile objective marker at some point.

ParajagerReadytoAssemble

I then assembled the model into three parts for painting, legs and base, body, engine, arms and head, and the paratrooper rifle. This allows easy access to the detailed areas around the waist of the model and the chest, which would be obstructed if the model were assembled in one piece before painting.

Jager assembled

I also took a couple of shots to show the scale of the Heavy Gear minis with other manufacturers. The first picture is with a Warhammer Battle for Skull Pass dwarf, and the second is with a Rebel minis 15mm Scourge model, a human sized robot.

Jager Dwarf

Jager15mm

The model is now waiting for the basing material to dry (I stick the sand down, wait for it to dry, and then apply a sealing layer of thinned down PVA glue). Tomorrow I will undercoat it and then start painting.

Edit: I've found out the little tank is actually a parachute, and goes between the V-engine turbines by the rear grab bar. A little superglue and green stuff secures this to the engine block, though when I assemble the second trooper I may pin it.